- The
ansible-vaultcommand is the main interface for managing encrypted content within Ansible. This command is used to initially encrypt files and is subsequently used to view, edit, or decrypt the data.Creating New Encrypted Files
To create a new file encrypted with Vault, use theansible-vault createcommand. Pass in the name of the file you wish to create. For example, to create an encrypted YAML file calledvault.ymlto store sensitive variables, you could type:- ansible-vault create vault.yml
You will be prompted to enter and confirm a password:OutputNew Vault password: Confirm New Vault password:When you have confirmed your password, Ansible will immediately open an editing window where you can enter your desired contents.To test the encryption function, enter some test text:vault.ymlSecret informationAnsible will encrypt the contents when you close the file. If you check the file, instead of seeing the words you typed, you will see an encrypted block:- cat vault.yml
Output$ANSIBLE_VAULT;1.1;AES256 65316332393532313030636134643235316439336133363531303838376235376635373430336333 3963353630373161356638376361646338353763363434360a363138376163666265336433633664 30336233323664306434626363643731626536643833336638356661396364313666366231616261 3764656365313263620a383666383233626665376364323062393462373266663066366536306163 31643731343666353761633563633634326139396230313734333034653238303166We can see some header information that Ansible uses to know how to handle the file, followed by the encrypted contents, which display as numbers.Encrypting Existing Files
If you already have a file that you wish to encrypt with Vault, use theansible-vault encryptcommand instead.For testing, we can create an example file by typing:- echo 'unencrypted stuff' > encrypt_me.txt
Now, you can encrypt the existing file by typing:- ansible-vault encrypt encrypt_me.txt
Again, you will be prompted to provide and confirm a password. Afterwards, a message will confirm the encryption:OutputNew Vault password: Confirm New Vault password: Encryption successfulInstead of opening an editing window,ansible-vaultwill encrypt the contents of the file and write it back to disk, replacing the unencrypted version.If we check the file, we should see a similar encrypted pattern:- cat encrypt_me.txt
Output$ANSIBLE_VAULT;1.1;AES256 66633936653834616130346436353865303665396430383430353366616263323161393639393136 3737316539353434666438373035653132383434303338640a396635313062386464306132313834 34313336313338623537333332356231386438666565616537616538653465333431306638643961 3636663633363562320a613661313966376361396336383864656632376134353039663662666437 39393639343966363565636161316339643033393132626639303332373339376664As you can see, Ansible encrypts existing content in much the same way as it encrypts new files.Viewing Encrypted Files
Sometimes, you may need to reference the contents of a vault-encrypted file without needing to edit it or write it to the filesystem unencrypted. Theansible-vault viewcommand feeds the contents of a file to standard out. By default, this means that the contents are displayed in the terminal.Pass the vault encrypted file to the command:- ansible-vault view vault.yml
You will be asked for the file’s password. After entering it successfully, the contents will be displayed:OutputVault password: Secret informationAs you can see, the password prompt is mixed into the output of file contents. Keep this in mind when usingansible-vault viewin automated processes.Editing Encrypted Files
When you need to edit an encrypted file, use theansible-vault editcommand:- ansible-vault edit vault.yml
You will be prompted for the file’s password. After entering it, Ansible will open the file an editing window, where you can make any necessary changes.Upon saving, the new contents will be encrypted using the file’s encryption password again and written to disk.Manually Decrypting Encrypted Files
To decrypt a vault encrypted file, use theansible-vault decryptcommand.Note: Because of the increased likelihood of accidentally committing sensitive data to your project repository, theansible-vault decryptcommand is only suggested for when you wish to remove encryption from a file permanently. If you need to view or edit a vault encrypted file, it is usually better to use theansible-vault vieworansible-vault editcommands, respectively.Pass in the name of the encrypted file:- ansible-vault decrypt vault.yml
You will be prompted for the encryption password for the file. Once you enter the correct password, the file will be decrypted:OutputVault password: Decryption successfulIf you view the file again, instead of the vault encryption, you should see the actual contents of the file:- cat vault.yml
OutputSecret informationYour file is now unencrypted on disk. Be sure to remove any sensitive information or re-encrypt the file when you are finished.
Showing posts with label Ansible Automation DO407 in bangalore. Show all posts
Showing posts with label Ansible Automation DO407 in bangalore. Show all posts
Wednesday, February 26, 2020
How To Manage Sensitive Files with ansible-vault
Monday, January 6, 2020
Ansible - Roles
Roles provide a framework for fully independent, or interdependent collections of variables, tasks, files, templates, and modules.
In Ansible, the role is the primary mechanism for breaking a playbook into multiple files. This simplifies writing complex playbooks, and it makes them easier to reuse. The breaking of playbook allows you to logically break the playbook into reusable components.
Each role is basically limited to a particular functionality or desired output, with all the necessary steps to provide that result either within that role itself or in other roles listed as dependencies.
Roles are not playbooks. Roles are small functionality which can be independently used but have to be used within playbooks. There is no way to directly execute a role. Roles have no explicit setting for which host the role will apply to.
Top-level playbooks are the bridge holding the hosts from your inventory file to roles that should be applied to those hosts.
Creating a New Role
The directory structure for roles is essential to create a new role.
Role Structure
Roles have a structured layout on the file system. The default structure can be changed but for now let us stick to defaults.
Each role is a directory tree in itself. The role name is the directory name within the /roles directory.
$ ansible-galaxy -h
Usage
ansible-galaxy [delete|import|info|init|install|list|login|remove|search|setup] [--help] [options] ...
Options
- -h, --help − Show this help message and exit.
- -v, --verbose − Verbose mode (-vvv for more, -vvvv to enable connection debugging)
- --version − Show program's version number and exit.
Creating a Role Directory
The above command has created the role directories.
$ ansible-galaxy init vivekrole
ERROR! The API server (https://galaxy.ansible.com/api/) is not responding, please try again later.

$ ansible-galaxy init --force --offline vivekrole
- vivekrole was created successfully

$ tree vivekrole/
vivekrole/
├── defaults
│   └── main.yml
├── files ├── handlers
│   └── main.yml
├── meta
│   └── main.yml
├── README.md ├── tasks
│   └── main.yml
├── templates ├── tests │   ├── inventory
│   └── test.yml
└── vars
    └── main.yml

8 directories, 8 files
Not all the directories will be used in the example and we will show the use of some of them in the example.
Utilizing Roles in Playbook
This is the code of the playbook we have written for demo purpose. This code is of the playbook vivek_orchestrate.yml. We have defined the hosts: tomcat-node and called the two roles – install-tomcat and start-tomcat.
The problem statement is that we have a war which we need to deploy on a machine via Ansible.
---
- hosts: tomcat-node
roles:
   - {role: install-tomcat}
   - {role: start-tomcat}
Contents of our directory structure from where we are running the playbook.
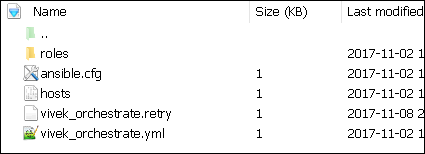
$ ls
ansible.cfg  hosts  roles  vivek_orchestrate.retry vivek_orchestrate.yml
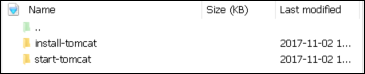
There is a tasks directory under each directory and it contains a main.yml. The main.yml contents of install-tomcat are −
---
#Install vivek artifacts
-
   block:
      - name: Install Tomcat artifacts
         action: >
            yum name = "demo-tomcat-1" state = present
         register: Output

   always:
      - debug:
         msg:
            - "Install Tomcat artifacts task ended with message: {{Output}}"
            - "Installed Tomcat artifacts - {{Output.changed}}"
The contents of main.yml of the start tomcat are −
#Start Tomcat
-
   block:
      - name: Start Tomcat
      command: <path of tomcat>/bin/startup.sh"
      register: output
      become: true

   always:
      - debug:
         msg:
            - "Start Tomcat task ended with message: {{output}}"
            - "Tomcat started - {{output.changed}}"
The advantage of breaking the playbook into roles is that anyone who wants to use the Install tomcat feature can call the Install Tomcat role.
Breaking a Playbook into a Role
If not for the roles, the content of the main.yml of the respective role can be copied in the playbook yml file. But to have modularity, roles were created.
Any logical entity which can be reused as a reusable function, that entity can be moved to role. The example for this is shown above
Ran the command to run the playbook.
-vvv option for verbose output – verbose output
$ cd vivek-playbook/
This is the command to run the playbook
$ sudo ansible-playbook -i hosts vivek_orchestrate.yml –vvv
-----------------------------------------------------------------
-----------------------------------------------------------------------
Output
The generated output is as seen on the screen −
Using /users/demo/vivek-playbook/ansible.cfg as config file.
PLAYBOOK: vivek_orchestrate.yml *********************************************************
***********************************************************
1 plays in vivek_orchestrate.yml

PLAY [tomcat-node] **********************************************************************
******** *************************************************

TASK [Gathering Facts] *************************************************
****************************** *********************************************
Tuesday 21 November 2017  13:02:05 +0530 (0:00:00.056) 0:00:00.056 ******
Using module file /usr/lib/python2.7/sitepackages/ansible/modules/system/setup.py
<localhost> ESTABLISH LOCAL CONNECTION FOR USER: root
<localhost> EXEC /bin/sh -c 'echo ~ && sleep 0'
<localhost> EXEC /bin/sh -c '( umask 77 && mkdir -p "` echo
   /root/.ansible/tmp/ansible-tmp-1511249525.88-259535494116870 `" &&
   echo ansible-tmp-1511249525.88-259535494116870="`
   echo /root/.ansible/tmp/ansibletmp-1511249525.88-259535494116870 `" ) && sleep 0'
<localhost> PUT /tmp/tmpPEPrkd TO
   /root/.ansible/tmp/ansible-tmp-1511249525.88259535494116870/setup.py
<localhost> EXEC /bin/sh -c 'chmod u+x
   /root/.ansible/tmp/ansible-tmp1511249525.88-259535494116870/
   /root/.ansible/tmp/ansible-tmp-1511249525.88259535494116870/setup.py && sleep 0'
<localhost> EXEC /bin/sh -c '/usr/bin/python
   /root/.ansible/tmp/ansible-tmp1511249525.88-259535494116870/setup.py; rm -rf
   "/root/.ansible/tmp/ansible-tmp1511249525.88-259535494116870/" > /dev/null 2>&1 && sleep 0'
ok: [server1]
META: ran handlers

TASK [install-tomcat : Install Tomcat artifacts] ***********************************
***************************************************************
task path: /users/demo/vivek-playbook/roles/install-tomcat/tasks/main.yml:5
Tuesday 21 November 2017  13:02:07 +0530 (0:00:01.515)       0:00:01.572 ******
Using module file /usr/lib/python2.7/sitepackages/ansible/modules/packaging/os/yum.py
<localhost> ESTABLISH LOCAL CONNECTION FOR USER: root
<localhost> EXEC /bin/sh -c 'echo ~ && sleep 0'
<localhost> EXEC /bin/sh -c '( umask 77 && mkdir -p "` echo
   /root/.ansible/tmp/ansible-tmp-1511249527.34-40247177825302 `" && echo
   ansibletmp-1511249527.34-40247177825302="` echo
   /root/.ansible/tmp/ansible-tmp1511249527.34-40247177825302 `" ) && sleep 0'
<localhost> PUT /tmp/tmpu83chg TO
   /root/.ansible/tmp/ansible-tmp-1511249527.3440247177825302/yum.py
<localhost> EXEC /bin/sh -c 'chmod u+x
   /root/.ansible/tmp/ansible-tmp1511249527.34-40247177825302/
   /root/.ansible/tmp/ansible-tmp-1511249527.3440247177825302/yum.py && sleep 0'
<localhost> EXEC /bin/sh -c '/usr/bin/python
   /root/.ansible/tmp/ansible-tmp1511249527.34-40247177825302/yum.py; rm -rf
   "/root/.ansible/tmp/ansible-tmp1511249527.34-40247177825302/" > /dev/null 2>
   &1 && sleep 0'
changed: [server1] => {
   "changed": true,
   "invocation": {
      "module_args": {
         "conf_file": null,
         "disable_gpg_check": false,
         "disablerepo": null,
         "enablerepo": null,
         "exclude": null,
         "install_repoquery": true,
         "installroot": "/",
         "list": null,
         "name": ["demo-tomcat-1"],
         "skip_broken": false,
         "state": "present",
         "update_cache": false,
         "validate_certs": true
      }
   },
   "msg": "",
   "rc": 0,
   "results": [
      "Loaded plugins: product-id,
      search-disabled-repos,
      subscriptionmanager\nThis system is not registered to Red Hat Subscription Management.
      You can use subscription-manager to register.\nResolving Dependencies\n-->
      Running transaction check\n--->
      Package demo-tomcat-1.noarch 0:SNAPSHOT-1 will be installed\n--> Finished Dependency
      Resolution\n\nDependencies Resolved\n
      \n================================================================================\n
      Package Arch Version Repository
      Size\n==================================================================\nInstalling:\n
      demo-tomcat-1 noarch SNAPSHOT-1 demo-repo1 7.1 M\n\nTransaction
      Summary\n==================================================================\nInstall  1
      Package\n\nTotal download size: 7.1 M\nInstalled size: 7.9 M\nDownloading
         packages:\nRunning transaction
      check\nRunning transaction test\nTransaction test succeeded\nRunning transaction\n  Installing :
      demotomcat-1-SNAPSHOT-1.noarch 1/1 \n  Verifying  :
      demo-tomcat-1-SNAPSHOT-1.noarch 1/1 \n\nInstalled:\n
      demo-tomcat-1.noarch 0:SNAPSHOT-1 \n\nComplete!\n"
   ]
}

TASK [install-tomcat : debug] **********************************************************
***************************************************************************
task path: /users/demo/vivek-playbook/roles/install-tomcat/tasks/main.yml:11
Tuesday 21 November 2017  13:02:13 +0530 (0:00:06.757) 0:00:08.329 ******
ok: [server1] => {
   "changed": false,
   "msg": [
      "Install Tomcat artifacts task ended with message: {
         u'msg': u'', u'changed': True, u'results':
         [u'Loaded plugins: product-id,
         search-disabledrepos,
         subscription-manager\\nThis system is not registered to Red Hat Subscription Management.
         You can use subscription-manager to register.\\nResolving Dependencies\\n-->
         Running transaction check\\n--->
         Package demo-tomcat-1.noarch 0:SNAPSHOT-1 will be installed\\n-->
         Finished Dependency Resolution\\n
         \\nDependencies
         Resolved\\n\\n==================================================================\\n
         Package Arch Version Repository
         Size\\n========================================================================
         =====\\nInstalling:\\n demo-tomcat-1 noarch SNAPSHOT-1 demo-repo1 7.1 M\\n\\nTransaction
         Summary\\n=========================================================\\nInstall  1
         Package\\n\\nTotal download size: 7.1 M\\nInstalled size: 7.9 M\\nDownloading
            packages:\\nRunning
         transaction check\\nRunning transaction test\\nTransaction test succeeded\\nRunning
            transaction\\n
         Installing : demo-tomcat-1-SNAPSHOT-1.noarch 1/1 \\n  Verifying  :
         demo-tomcat-1-SNAPSHOT-1.noarch
         1/1 \\n\\nInstalled:\\n  demo-tomcat-1.noarch 0:SNAPSHOT-1  \\n\\nComplete!\\n'], u'rc': 0
      }",
      "Installed Tomcat artifacts - True"
   ]
}

TASK [install-tomcat : Clean DEMO environment] ****************************************
************************************************************
task path: /users/demo/vivek-playbook/roles/install-tomcat/tasks/main.yml:19
Tuesday 21 November 2017  13:02:13 +0530 (0:00:00.057) 0:00:08.387 ******
[WARNING]: when statements should not include jinja2 templating delimiters such as {{ }} or
   {% %}. Found: {{installationOutput.changed}}

Using module file /usr/lib/python2.7/sitepackages/ansible/modules/files/file.py
<localhost> ESTABLISH LOCAL CONNECTION FOR USER: root
<localhost> EXEC /bin/sh -c 'echo ~ && sleep 0'
<localhost> EXEC /bin/sh -c '( umask 77 && mkdir -p "` echo
   /root/.ansible/tmp/ansible-tmp-1511249534.13-128345805983963 `" && echo
   ansible-tmp-1511249534.13-128345805983963="` echo
   /root/.ansible/tmp/ansibletmp-1511249534.13-128345805983963 `" ) && sleep 0'
<localhost> PUT /tmp/tmp0aXel7 TO
   /root/.ansible/tmp/ansible-tmp-1511249534.13128345805983963/file.py
<localhost> EXEC /bin/sh -c 'chmod u+x
   /root/.ansible/tmp/ansible-tmp1511249534.13-128345805983963/
   /root/.ansible/tmp/ansible-tmp-1511249534.13128345805983963/file.py && sleep 0'
<localhost> EXEC /bin/sh -c '/usr/bin/python
   /root/.ansible/tmp/ansible-tmp1511249534.13-128345805983963/file.py; rm -rf
   "/root/.ansible/tmp/ansible-tmp1511249534.13-128345805983963/" > /dev/null 2>&1
   && sleep 0'
changed: [server1] => {
   "changed": true,
      "diff": {
         "after": {
            "path": "/users/demo/DEMO",
            "state": "absent"
      },
      "before": {
         "path": "/users/demo/DEMO",
         "state": "directory"
      }
   },

   "invocation": {
      "module_args": {
         "attributes": null,
         "backup": null,
         "content": null,
         "delimiter": null,
         "diff_peek": null,
         "directory_mode": null,
         "follow": false,
         "force": false,
         "group": null,
         "mode": null,
         "original_basename": null,
         "owner": null,
         "path": "/users/demo/DEMO",
         "recurse": false,
         "regexp": null,
         "remote_src": null,
         "selevel": null,
         "serole": null,
         "setype": null,
         "seuser": null,
         "src": null,
         "state": "absent",
         "unsafe_writes": null,
         "validate": null
      }
   },
   "path": "/users/demo/DEMO",
   "state": "absent"
}

TASK [install-tomcat : debug] ********************************************************
*************************************************************
task path: /users/demo/vivek-playbook/roles/install-tomcat/tasks/main.yml:29
Tuesday 21 November 2017  13:02:14 +0530 (0:00:00.257)       0:00:08.645 ******
ok: [server1] => {
   "changed": false,
   "msg": [
      "Clean DEMO environment task ended with message:{u'diff': {u'after': {u'path':
         u'/users/demo/DEMO', u'state': u'absent'},
      u'before': {u'path': u'/users/demo/DEMO', u'state': u'directory'}}, u'state': u'absent',
         u'changed': True, u'path': u'/users/demo/DEMO'}",
      "check value  :True"
   ]
}

TASK [install-tomcat : Copy Tomcat to user home] *************************************
********************************************************
task path: /users/demo/vivek-playbook/roles/install-tomcat/tasks/main.yml:37
Tuesday 21 November 2017  13:02:14 +0530 (0:00:00.055)       0:00:08.701 ******
[WARNING]: when statements should not include jinja2 templating delimiters such as {{ }} or
   {% %}. Found: {{installationOutput.changed}}

Using module file /usr/lib/python2.7/sitepackages/ansible/modules/commands/command.py
<localhost> ESTABLISH LOCAL CONNECTION FOR USER: root
<localhost> EXEC /bin/sh -c 'echo ~ && sleep 0'
<localhost> EXEC /bin/sh -c '( umask 77 && mkdir -p "` echo
   /root/.ansible/tmp/ansible-tmp-1511249534.43-41077200718443 `" && echo
   ansibletmp-1511249534.43-41077200718443="` echo
   /root/.ansible/tmp/ansible-tmp1511249534.43-41077200718443 `" ) && sleep 0'
<localhost> PUT /tmp/tmp25deWs TO
   /root/.ansible/tmp/ansible-tmp-1511249534.4341077200718443/command.py
<localhost> EXEC /bin/sh -c 'chmod u+x
   /root/.ansible/tmp/ansible-tmp1511249534.43-41077200718443/
   /root/.ansible/tmp/ansible-tmp-1511249534.4341077200718443/command.py && sleep 0'
<localhost> EXEC /bin/sh -c '/usr/bin/python
   /root/.ansible/tmp/ansible-tmp1511249534.43-41077200718443/command.py; rm -rf
   "/root/.ansible/tmp/ansibletmp-1511249534.43-41077200718443/" > /dev/null 2>&1
   && sleep 0'
changed: [server1] => {
   "changed": true,
   "cmd": [
      "cp",
      "-r",
      "/opt/ansible/tomcat/demo",
      "/users/demo/DEMO/"
   ],
   "delta": "0:00:00.017923",
   "end": "2017-11-21 13:02:14.547633",
   "invocation": {
      "module_args": {
         "_raw_params": "cp -r /opt/ansible/tomcat/demo /users/demo/DEMO/",
         "_uses_shell": false,
         "chdir": null,
         "creates": null,
         "executable": null,
         "removes": null,
         "warn": true
      }
   },
   "rc": 0,
   "start": "2017-11-21 13:02:14.529710",
   "stderr": "",
   "stderr_lines": [],
   "stdout": "",
   "stdout_lines": []
}

TASK [install-tomcat : debug] ********************************************************
**********************************************************
task path: /users/demo/vivek-playbook/roles/install-tomcat/tasks/main.yml:47
Tuesday 21 November 2017  13:02:14 +0530 (0:00:00.260)       0:00:08.961 ******
ok: [server1] => {
   "changed": false,
   "msg": "Copy Tomcat to user home task ended with message {
      'stderr_lines': [], u'changed': True, u'end': u'2017-11-21 13:02:14.547633', u'stdout':
      u'', u'cmd': [u'cp', u'-r', u'/opt/ansible/tomcat/demo', u'/users/demo/DEMO/'], u'rc': 0,
      u'start': u'2017-11-21 13:02:14.529710', u'stderr': u'', u'delta': u'0:00:00.017923',
      'stdout_lines': []}"
}

TASK [start-tomcat : Start Tomcat] **************************************************
**********************************************************
task path: /users/demo/vivek-playbook/roles/start-tomcat/tasks/main.yml:5
Tuesday 21 November 2017  13:02:14 +0530 (0:00:00.044)       0:00:09.006 ******
Using module file /usr/lib/python2.7/sitepackages/ansible/modules/commands/command.py
<localhost> ESTABLISH LOCAL CONNECTION FOR USER: root
<localhost> EXEC /bin/sh -c 'echo ~ && sleep 0'
<localhost> EXEC /bin/sh -c '( umask 77 && mkdir -p "` echo
   /root/.ansible/tmp/ansible-tmp-1511249534.63-46501211251197 `" && echo
   ansibletmp-1511249534.63-46501211251197="` echo
   /root/.ansible/tmp/ansible-tmp1511249534.63-46501211251197 `" ) && sleep 0'
<localhost> PUT /tmp/tmp9f06MQ TO
   /root/.ansible/tmp/ansible-tmp-1511249534.6346501211251197/command.py
<localhost> EXEC /bin/sh -c 'chmod u+x
   /root/.ansible/tmp/ansible-tmp1511249534.63-46501211251197/
   /root/.ansible/tmp/ansible-tmp-1511249534.6346501211251197/command.py && sleep 0'
<localhost> EXEC /bin/sh -c '/usr/bin/python
   /root/.ansible/tmp/ansible-tmp1511249534.63-46501211251197/command.py; rm -rf
   "/root/.ansible/tmp/ansibletmp-1511249534.63-46501211251197/" > /dev/null 2>&1
   && sleep 0'
changed: [server1] => {
   "changed": true,
   "cmd": [ "/users/demo/DEMO/bin/startup.sh" ],
   "delta": "0:00:00.020024",
   "end": "2017-11-21 13:02:14.741649",
   "invocation": {
      "module_args": {
         "_raw_params": "/users/demo/DEMO/bin/startup.sh",
         "_uses_shell": false,
         "chdir": null,
         "creates": null,
         "executable": null,
         "removes": null,
         "warn": true
      }
   },
   "rc": 0,
   "start": "2017-11-21 13:02:14.721625",
   "stderr": "",
   "stderr_lines": [],
   "stdout": "Tomcat started.",
   "stdout_lines": [ "Tomcat started." ]
}

TASK [start-tomcat : debug] *************************************************
**********************************************************************
task path: /users/demo/vivek-playbook/roles/start-tomcat/tasks/main.yml:10
Tuesday 21 November 2017  13:02:14 +0530 (0:00:00.150)       0:00:09.156 ******
ok: [server1] => {
   "changed": false,
   "msg": [
      "Start Tomcat task ended with message: {'
         stderr_lines': [], u'changed': True, u'end': u'2017-11-21 13:02:14.741649', u'stdout':
         u'Tomcat started.', u'cmd': [u'/users/demo/DEMO/bin/startup.sh'], u'rc': 0, u'start':
         u'2017-11-21 13:02:14.721625', u'stderr': u'', u'delta': u'0:00:00.020024',
         'stdout_lines': [u'Tomcat started.']}",
      "Tomcat started - True"
   ]
}
META: ran handlers
META: ran handlers

PLAY RECAP *******************************************************************************
*********************************************************
server1  : ok = 9    changed = 4    unreachable = 0    failed = 0

Tuesday 21 November 2017  13:02:14 +0530 (0:00:00.042)       0:00:09.198 ******
===============================================================================
install-tomcat : Install Tomcat artifacts ------------------------------- 6.76s
/users/demo/vivek-playbook/roles/install-tomcat/tasks/main.yml:5 --------------
Gathering Facts --------------------------------------------------------- 1.52s
 ------------------------------------------------------------------------------
install-tomcat : Copy Tomcat to user home ------------------------------- 0.26s
/users/demo/vivek-playbook/roles/install-tomcat/tasks/main.yml:37 -------------

install-tomcat : Clean DEMO environment --------------------------------- 0.26s
/users/demo/vivek-playbook/roles/install-tomcat/tasks/main.yml:19 -------------

start-tomcat : Start Tomcat --------------------------------------------- 0.15s
/users/demo/vivek-playbook/roles/start-tomcat/tasks/main.yml:5 ----------------

install-tomcat : debug -------------------------------------------------- 0.06s
/users/demo/vivek-playbook/roles/install-tomcat/tasks/main.yml:11 -------------

install-tomcat : debug -------------------------------------------------- 0.06s
/users/demo/vivek-playbook/roles/install-tomcat/tasks/main.yml:29 -------------

install-tomcat : debug -------------------------------------------------- 0.04s
/users/demo/vivek-playbook/roles/install-tomcat/tasks/main.yml:47 -------------

start-tomcat : debug ---------------------------------------------------- 0.04s
/users/demo/vivek-playbook/roles/start-tomcat/tasks/main.yml:10 ---------------
Hit the following URL and you will be directed to a page as shown below − http://10.76.0.134:11677/HelloWorld/HelloWorld
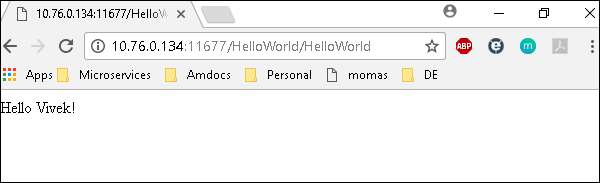
The deployed war just has a servlet which displays “Hello World”. The detailed output shows the time taken by each and every task because of the entry added in ansible.cfg file −
[defaults]
callback_whitelist = profile_tasks
Thursday, January 2, 2020
Ansible Installation, Playbook, Roles, Commands
What is Ansible?
Ansible is an automation and orchestration tool popular for its simplicity of installation, ease of use in what concerns the connectivity to clients, its lack of agent for ansible clients and the multitude of skills.
Ansible functions by connecting via SSH to the clients, so it doesn't need a special agent on the client-side, and by pushing modules to the clients. The modules are then executed locally, on the client-side, and the output is pushed back to the Ansible server.
Since it uses SSH, it can very easily connect to clients using SSH-Keys, simplifying though the whole process. Client details, like hostnames or IP addresses and SSH ports, are stored in files called inventory files. Once you have created an inventory file and populated it, ansible can use it.
Why use Ansible?
Here are some important pros/benefits of using Ansible
- One of the most significant advantages of Ansible is that it is free to use by everyone.
- It does not need any special system administrator skills to install and use Ansible, and the official documentation is very comprehensive.
- Its modularity regarding plugins, modules, inventories, and playbooks make Ansible the perfect companion to orchestrate large environments.
- Ansible is very lightweight and consistent, and no constraints regarding the operating system or underlying hardware are present.
- It is also very secure due to its agentless capabilities and due to the use of OpenSSH security features.
- Another advantage that encourages the adoption of Ansible is its smooth learning curve determined by the comprehensive documentation and easy to learn structure and configuration.
Important terms used in Ansible
Ansible server:
The machine where Ansible is installed and from which all tasks and playbooks will be ranModule:
Basically, a module is a command or set of similar commands meant to be executed on the client-sideTask:
A task is a section that consists of a single procedure to be completedRole:
A way of organizing tasks and related files to be later called in a playbookFact:
Information fetched from the client system from the global variables with the gather-facts operationInventory:
File containing data about the ansible client servers. Defined in later examples as hosts filePlay:
Execution of a playbookHandler:
Task which is called only if a notifier is presentNotifier:
Section attributed to a task which calls a handler if the output is changedTag:
Name set to a task which can be used later on to issue just that specific task or group of tasks.
Ansible Installation in Linux
Once you have compared and weighed your options and decided to go for Ansible, the next step is to have it installed on your system. We will go through the steps of installation in different Linux distributions, the most popular ones, in the next small tutorial.
Install Ansible on Centos/RedHat systems
Step 1) Install EPEL repo
[root@ansible-server ~]# sudo yum install epel-release
Step 2) Install ansible package
[root@ansible-server ~]# sudo yum install -y ansible

Install ansible on Ubuntu/Debian systems
Step 1) Perform an update to the packages
$ sudo apt update
Step 2) Install the software-properties-common package
$ sudo apt install software-properties-common
Step 3) Install ansible personal package archive
$ sudo apt-add-repository ppa:ansible/ansible
Step 4) Install ansible
$ sudo apt update
$ sudo apt install ansible
Ansible ad-hoc commands
One of the simplest ways Ansible can be used is by using ad-hoc commands. These can be used when you want to issue some commands on a server or a bunch of servers. Ad-hoc commands are not stored for future uses but represent a fast way to interact with the desired servers.For this tutorial, a simple two servers hosts file will be configured, containing host1 and host2.You can make sure that the hosts are accessible from the ansible server by issuing a ping command on all hosts.[root@ansible-server test_ansible]# ansible -i hosts all -m ping host1 | SUCCESS => { "changed": false, "ping": "pong" } host2 | SUCCESS => { "changed": false, "ping": "pong" }

Tuesday, January 2, 2018
Automation with Ansible(DO407)
Automation with Ansible (DO407)

Course overview
Through hands-on labs, students will learn to automate system administration tasks on managed hosts with Ansible, learn how to write Ansible playbooks to standardize task execution, centrally manage playbooks and schedule recurring execution through a web interface with Ansible Tower. Students will also learn to manage encryption for Ansible with Ansible Vault, deploy Ansible Tower and use it to manage systems, and use Ansible in a DevOps environment with Vagrant.

Course content summary
Install and troubleshoot Ansible on central nodes and managed hosts
Use Ansible to run ad-hoc commands and playbooks to automate tasks
Write effective Ansible playbooks
Protect encrypted data needed for tasks with Ansible Vault
Use Ansible Tower to more easily manage enterprise Ansible deployments
Work with Ansible in conjunction with Vagrant in a DevOps environment
Outline for this course
Course introduction
Introduce and review the course.
Introduce Ansible
Describe the terminology and architecture of Ansible.
Deploy Ansible
Install Ansible and run ad hoc commands.
Implement playbooks
Write Ansible plays and execute a playbook.
Manage variables and inclusions
Describe variable scope and precedence, manage variables and facts in a play, and manage inclusions.
Implement task control
Manage task control, handlers, and tags in Ansible playbooks.
Implement Jinja2 templates
Implement a Jinja2 template.
Implement roles
Create and manage roles.
Configure complex playbooks
Configure connection types, delegations, and parallelism.
Implement Ansible Vault
Manage encryption with Ansible Vault.
Troubleshoot Ansible
Troubleshoot the Ansible control machine and managed nodes.
Implement Ansible Tower
Implement Ansible Tower.
Implement Ansible in a DevOps environment
Implement Ansible in a DevOps environment using Vagrant.
Comprehensive review
Review tasks from the Automation with Ansible course.
Subscribe to:
Posts (Atom)
-
 Red Hat Enterprise Performance Tuning (RH442) Course Overview : This system architecture with emphasis on Understanding the implica...
 -
How Install and Configure OpenLDAP on CentOS / RHEL Linux LDAP stands for Lightweight Directory Access Protocol. LDAP is a solution...
-
EX-248 : 31-12-2014 : Chennai : EX-248 Date-31.12.14.pdf EX-210 : 26-12-2014 : Chennai : EX-210 Date-26.12.14.pdf ...

Networking terms in basic level
Basics of Computer Networking Open system: A system which is connected to the network and is ready for communication. Closed system...