Roles provide a framework for fully independent, or interdependent collections of variables, tasks, files, templates, and modules.
In Ansible, the role is the primary mechanism for breaking a playbook into multiple files. This simplifies writing complex playbooks, and it makes them easier to reuse. The breaking of playbook allows you to logically break the playbook into reusable components.
Each role is basically limited to a particular functionality or desired output, with all the necessary steps to provide that result either within that role itself or in other roles listed as dependencies.
Roles are not playbooks. Roles are small functionality which can be independently used but have to be used within playbooks. There is no way to directly execute a role. Roles have no explicit setting for which host the role will apply to.
Top-level playbooks are the bridge holding the hosts from your inventory file to roles that should be applied to those hosts.
Creating a New Role
The directory structure for roles is essential to create a new role.
Role Structure
Roles have a structured layout on the file system. The default structure can be changed but for now let us stick to defaults.
Each role is a directory tree in itself. The role name is the directory name within the /roles directory.
$ ansible-galaxy -h
Usage
ansible-galaxy [delete|import|info|init|install|list|login|remove|search|setup] [--help] [options] ...
Options
- -h, --help − Show this help message and exit.
- -v, --verbose − Verbose mode (-vvv for more, -vvvv to enable connection debugging)
- --version − Show program's version number and exit.
Creating a Role Directory
The above command has created the role directories.
$ ansible-galaxy init vivekrole
ERROR! The API server (https://galaxy.ansible.com/api/) is not responding, please try again later.

$ ansible-galaxy init --force --offline vivekrole
- vivekrole was created successfully

$ tree vivekrole/
vivekrole/
├── defaults
│   └── main.yml
├── files ├── handlers
│   └── main.yml
├── meta
│   └── main.yml
├── README.md ├── tasks
│   └── main.yml
├── templates ├── tests │   ├── inventory
│   └── test.yml
└── vars
    └── main.yml

8 directories, 8 files
Not all the directories will be used in the example and we will show the use of some of them in the example.
Utilizing Roles in Playbook
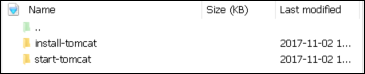
This is the code of the playbook we have written for demo purpose. This code is of the playbook vivek_orchestrate.yml. We have defined the hosts: tomcat-node and called the two roles – install-tomcat and start-tomcat.
The problem statement is that we have a war which we need to deploy on a machine via Ansible.
---
- hosts: tomcat-node
roles:
   - {role: install-tomcat}
   - {role: start-tomcat}
Contents of our directory structure from where we are running the playbook.
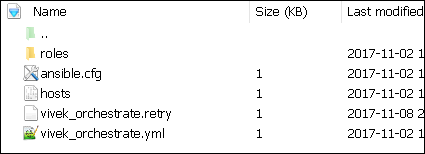
$ ls
ansible.cfg  hosts  roles  vivek_orchestrate.retry vivek_orchestrate.yml
There is a tasks directory under each directory and it contains a main.yml. The main.yml contents of install-tomcat are −
---
#Install vivek artifacts
-
   block:
      - name: Install Tomcat artifacts
         action: >
            yum name = "demo-tomcat-1" state = present
         register: Output

   always:
      - debug:
         msg:
            - "Install Tomcat artifacts task ended with message: {{Output}}"
            - "Installed Tomcat artifacts - {{Output.changed}}"
The contents of main.yml of the start tomcat are −
#Start Tomcat
-
   block:
      - name: Start Tomcat
      command: <path of tomcat>/bin/startup.sh"
      register: output
      become: true

   always:
      - debug:
         msg:
            - "Start Tomcat task ended with message: {{output}}"
            - "Tomcat started - {{output.changed}}"
The advantage of breaking the playbook into roles is that anyone who wants to use the Install tomcat feature can call the Install Tomcat role.
Breaking a Playbook into a Role
If not for the roles, the content of the main.yml of the respective role can be copied in the playbook yml file. But to have modularity, roles were created.
Any logical entity which can be reused as a reusable function, that entity can be moved to role. The example for this is shown above
Ran the command to run the playbook.
-vvv option for verbose output – verbose output
$ cd vivek-playbook/
This is the command to run the playbook
$ sudo ansible-playbook -i hosts vivek_orchestrate.yml –vvv
-----------------------------------------------------------------
-----------------------------------------------------------------------
Output
The generated output is as seen on the screen −
Using /users/demo/vivek-playbook/ansible.cfg as config file.
PLAYBOOK: vivek_orchestrate.yml *********************************************************
***********************************************************
1 plays in vivek_orchestrate.yml

PLAY [tomcat-node] **********************************************************************
******** *************************************************

TASK [Gathering Facts] *************************************************
****************************** *********************************************
Tuesday 21 November 2017  13:02:05 +0530 (0:00:00.056) 0:00:00.056 ******
Using module file /usr/lib/python2.7/sitepackages/ansible/modules/system/setup.py
<localhost> ESTABLISH LOCAL CONNECTION FOR USER: root
<localhost> EXEC /bin/sh -c 'echo ~ && sleep 0'
<localhost> EXEC /bin/sh -c '( umask 77 && mkdir -p "` echo
   /root/.ansible/tmp/ansible-tmp-1511249525.88-259535494116870 `" &&
   echo ansible-tmp-1511249525.88-259535494116870="`
   echo /root/.ansible/tmp/ansibletmp-1511249525.88-259535494116870 `" ) && sleep 0'
<localhost> PUT /tmp/tmpPEPrkd TO
   /root/.ansible/tmp/ansible-tmp-1511249525.88259535494116870/setup.py
<localhost> EXEC /bin/sh -c 'chmod u+x
   /root/.ansible/tmp/ansible-tmp1511249525.88-259535494116870/
   /root/.ansible/tmp/ansible-tmp-1511249525.88259535494116870/setup.py && sleep 0'
<localhost> EXEC /bin/sh -c '/usr/bin/python
   /root/.ansible/tmp/ansible-tmp1511249525.88-259535494116870/setup.py; rm -rf
   "/root/.ansible/tmp/ansible-tmp1511249525.88-259535494116870/" > /dev/null 2>&1 && sleep 0'
ok: [server1]
META: ran handlers

TASK [install-tomcat : Install Tomcat artifacts] ***********************************
***************************************************************
task path: /users/demo/vivek-playbook/roles/install-tomcat/tasks/main.yml:5
Tuesday 21 November 2017  13:02:07 +0530 (0:00:01.515)       0:00:01.572 ******
Using module file /usr/lib/python2.7/sitepackages/ansible/modules/packaging/os/yum.py
<localhost> ESTABLISH LOCAL CONNECTION FOR USER: root
<localhost> EXEC /bin/sh -c 'echo ~ && sleep 0'
<localhost> EXEC /bin/sh -c '( umask 77 && mkdir -p "` echo
   /root/.ansible/tmp/ansible-tmp-1511249527.34-40247177825302 `" && echo
   ansibletmp-1511249527.34-40247177825302="` echo
   /root/.ansible/tmp/ansible-tmp1511249527.34-40247177825302 `" ) && sleep 0'
<localhost> PUT /tmp/tmpu83chg TO
   /root/.ansible/tmp/ansible-tmp-1511249527.3440247177825302/yum.py
<localhost> EXEC /bin/sh -c 'chmod u+x
   /root/.ansible/tmp/ansible-tmp1511249527.34-40247177825302/
   /root/.ansible/tmp/ansible-tmp-1511249527.3440247177825302/yum.py && sleep 0'
<localhost> EXEC /bin/sh -c '/usr/bin/python
   /root/.ansible/tmp/ansible-tmp1511249527.34-40247177825302/yum.py; rm -rf
   "/root/.ansible/tmp/ansible-tmp1511249527.34-40247177825302/" > /dev/null 2>
   &1 && sleep 0'
changed: [server1] => {
   "changed": true,
   "invocation": {
      "module_args": {
         "conf_file": null,
         "disable_gpg_check": false,
         "disablerepo": null,
         "enablerepo": null,
         "exclude": null,
         "install_repoquery": true,
         "installroot": "/",
         "list": null,
         "name": ["demo-tomcat-1"],
         "skip_broken": false,
         "state": "present",
         "update_cache": false,
         "validate_certs": true
      }
   },
   "msg": "",
   "rc": 0,
   "results": [
      "Loaded plugins: product-id,
      search-disabled-repos,
      subscriptionmanager\nThis system is not registered to Red Hat Subscription Management.
      You can use subscription-manager to register.\nResolving Dependencies\n-->
      Running transaction check\n--->
      Package demo-tomcat-1.noarch 0:SNAPSHOT-1 will be installed\n--> Finished Dependency
      Resolution\n\nDependencies Resolved\n
      \n================================================================================\n
      Package Arch Version Repository
      Size\n==================================================================\nInstalling:\n
      demo-tomcat-1 noarch SNAPSHOT-1 demo-repo1 7.1 M\n\nTransaction
      Summary\n==================================================================\nInstall  1
      Package\n\nTotal download size: 7.1 M\nInstalled size: 7.9 M\nDownloading
         packages:\nRunning transaction
      check\nRunning transaction test\nTransaction test succeeded\nRunning transaction\n  Installing :
      demotomcat-1-SNAPSHOT-1.noarch 1/1 \n  Verifying  :
      demo-tomcat-1-SNAPSHOT-1.noarch 1/1 \n\nInstalled:\n
      demo-tomcat-1.noarch 0:SNAPSHOT-1 \n\nComplete!\n"
   ]
}

TASK [install-tomcat : debug] **********************************************************
***************************************************************************
task path: /users/demo/vivek-playbook/roles/install-tomcat/tasks/main.yml:11
Tuesday 21 November 2017  13:02:13 +0530 (0:00:06.757) 0:00:08.329 ******
ok: [server1] => {
   "changed": false,
   "msg": [
      "Install Tomcat artifacts task ended with message: {
         u'msg': u'', u'changed': True, u'results':
         [u'Loaded plugins: product-id,
         search-disabledrepos,
         subscription-manager\\nThis system is not registered to Red Hat Subscription Management.
         You can use subscription-manager to register.\\nResolving Dependencies\\n-->
         Running transaction check\\n--->
         Package demo-tomcat-1.noarch 0:SNAPSHOT-1 will be installed\\n-->
         Finished Dependency Resolution\\n
         \\nDependencies
         Resolved\\n\\n==================================================================\\n
         Package Arch Version Repository
         Size\\n========================================================================
         =====\\nInstalling:\\n demo-tomcat-1 noarch SNAPSHOT-1 demo-repo1 7.1 M\\n\\nTransaction
         Summary\\n=========================================================\\nInstall  1
         Package\\n\\nTotal download size: 7.1 M\\nInstalled size: 7.9 M\\nDownloading
            packages:\\nRunning
         transaction check\\nRunning transaction test\\nTransaction test succeeded\\nRunning
            transaction\\n
         Installing : demo-tomcat-1-SNAPSHOT-1.noarch 1/1 \\n  Verifying  :
         demo-tomcat-1-SNAPSHOT-1.noarch
         1/1 \\n\\nInstalled:\\n  demo-tomcat-1.noarch 0:SNAPSHOT-1  \\n\\nComplete!\\n'], u'rc': 0
      }",
      "Installed Tomcat artifacts - True"
   ]
}

TASK [install-tomcat : Clean DEMO environment] ****************************************
************************************************************
task path: /users/demo/vivek-playbook/roles/install-tomcat/tasks/main.yml:19
Tuesday 21 November 2017  13:02:13 +0530 (0:00:00.057) 0:00:08.387 ******
[WARNING]: when statements should not include jinja2 templating delimiters such as {{ }} or
   {% %}. Found: {{installationOutput.changed}}

Using module file /usr/lib/python2.7/sitepackages/ansible/modules/files/file.py
<localhost> ESTABLISH LOCAL CONNECTION FOR USER: root
<localhost> EXEC /bin/sh -c 'echo ~ && sleep 0'
<localhost> EXEC /bin/sh -c '( umask 77 && mkdir -p "` echo
   /root/.ansible/tmp/ansible-tmp-1511249534.13-128345805983963 `" && echo
   ansible-tmp-1511249534.13-128345805983963="` echo
   /root/.ansible/tmp/ansibletmp-1511249534.13-128345805983963 `" ) && sleep 0'
<localhost> PUT /tmp/tmp0aXel7 TO
   /root/.ansible/tmp/ansible-tmp-1511249534.13128345805983963/file.py
<localhost> EXEC /bin/sh -c 'chmod u+x
   /root/.ansible/tmp/ansible-tmp1511249534.13-128345805983963/
   /root/.ansible/tmp/ansible-tmp-1511249534.13128345805983963/file.py && sleep 0'
<localhost> EXEC /bin/sh -c '/usr/bin/python
   /root/.ansible/tmp/ansible-tmp1511249534.13-128345805983963/file.py; rm -rf
   "/root/.ansible/tmp/ansible-tmp1511249534.13-128345805983963/" > /dev/null 2>&1
   && sleep 0'
changed: [server1] => {
   "changed": true,
      "diff": {
         "after": {
            "path": "/users/demo/DEMO",
            "state": "absent"
      },
      "before": {
         "path": "/users/demo/DEMO",
         "state": "directory"
      }
   },

   "invocation": {
      "module_args": {
         "attributes": null,
         "backup": null,
         "content": null,
         "delimiter": null,
         "diff_peek": null,
         "directory_mode": null,
         "follow": false,
         "force": false,
         "group": null,
         "mode": null,
         "original_basename": null,
         "owner": null,
         "path": "/users/demo/DEMO",
         "recurse": false,
         "regexp": null,
         "remote_src": null,
         "selevel": null,
         "serole": null,
         "setype": null,
         "seuser": null,
         "src": null,
         "state": "absent",
         "unsafe_writes": null,
         "validate": null
      }
   },
   "path": "/users/demo/DEMO",
   "state": "absent"
}

TASK [install-tomcat : debug] ********************************************************
*************************************************************
task path: /users/demo/vivek-playbook/roles/install-tomcat/tasks/main.yml:29
Tuesday 21 November 2017  13:02:14 +0530 (0:00:00.257)       0:00:08.645 ******
ok: [server1] => {
   "changed": false,
   "msg": [
      "Clean DEMO environment task ended with message:{u'diff': {u'after': {u'path':
         u'/users/demo/DEMO', u'state': u'absent'},
      u'before': {u'path': u'/users/demo/DEMO', u'state': u'directory'}}, u'state': u'absent',
         u'changed': True, u'path': u'/users/demo/DEMO'}",
      "check value  :True"
   ]
}

TASK [install-tomcat : Copy Tomcat to user home] *************************************
********************************************************
task path: /users/demo/vivek-playbook/roles/install-tomcat/tasks/main.yml:37
Tuesday 21 November 2017  13:02:14 +0530 (0:00:00.055)       0:00:08.701 ******
[WARNING]: when statements should not include jinja2 templating delimiters such as {{ }} or
   {% %}. Found: {{installationOutput.changed}}

Using module file /usr/lib/python2.7/sitepackages/ansible/modules/commands/command.py
<localhost> ESTABLISH LOCAL CONNECTION FOR USER: root
<localhost> EXEC /bin/sh -c 'echo ~ && sleep 0'
<localhost> EXEC /bin/sh -c '( umask 77 && mkdir -p "` echo
   /root/.ansible/tmp/ansible-tmp-1511249534.43-41077200718443 `" && echo
   ansibletmp-1511249534.43-41077200718443="` echo
   /root/.ansible/tmp/ansible-tmp1511249534.43-41077200718443 `" ) && sleep 0'
<localhost> PUT /tmp/tmp25deWs TO
   /root/.ansible/tmp/ansible-tmp-1511249534.4341077200718443/command.py
<localhost> EXEC /bin/sh -c 'chmod u+x
   /root/.ansible/tmp/ansible-tmp1511249534.43-41077200718443/
   /root/.ansible/tmp/ansible-tmp-1511249534.4341077200718443/command.py && sleep 0'
<localhost> EXEC /bin/sh -c '/usr/bin/python
   /root/.ansible/tmp/ansible-tmp1511249534.43-41077200718443/command.py; rm -rf
   "/root/.ansible/tmp/ansibletmp-1511249534.43-41077200718443/" > /dev/null 2>&1
   && sleep 0'
changed: [server1] => {
   "changed": true,
   "cmd": [
      "cp",
      "-r",
      "/opt/ansible/tomcat/demo",
      "/users/demo/DEMO/"
   ],
   "delta": "0:00:00.017923",
   "end": "2017-11-21 13:02:14.547633",
   "invocation": {
      "module_args": {
         "_raw_params": "cp -r /opt/ansible/tomcat/demo /users/demo/DEMO/",
         "_uses_shell": false,
         "chdir": null,
         "creates": null,
         "executable": null,
         "removes": null,
         "warn": true
      }
   },
   "rc": 0,
   "start": "2017-11-21 13:02:14.529710",
   "stderr": "",
   "stderr_lines": [],
   "stdout": "",
   "stdout_lines": []
}

TASK [install-tomcat : debug] ********************************************************
**********************************************************
task path: /users/demo/vivek-playbook/roles/install-tomcat/tasks/main.yml:47
Tuesday 21 November 2017  13:02:14 +0530 (0:00:00.260)       0:00:08.961 ******
ok: [server1] => {
   "changed": false,
   "msg": "Copy Tomcat to user home task ended with message {
      'stderr_lines': [], u'changed': True, u'end': u'2017-11-21 13:02:14.547633', u'stdout':
      u'', u'cmd': [u'cp', u'-r', u'/opt/ansible/tomcat/demo', u'/users/demo/DEMO/'], u'rc': 0,
      u'start': u'2017-11-21 13:02:14.529710', u'stderr': u'', u'delta': u'0:00:00.017923',
      'stdout_lines': []}"
}

TASK [start-tomcat : Start Tomcat] **************************************************
**********************************************************
task path: /users/demo/vivek-playbook/roles/start-tomcat/tasks/main.yml:5
Tuesday 21 November 2017  13:02:14 +0530 (0:00:00.044)       0:00:09.006 ******
Using module file /usr/lib/python2.7/sitepackages/ansible/modules/commands/command.py
<localhost> ESTABLISH LOCAL CONNECTION FOR USER: root
<localhost> EXEC /bin/sh -c 'echo ~ && sleep 0'
<localhost> EXEC /bin/sh -c '( umask 77 && mkdir -p "` echo
   /root/.ansible/tmp/ansible-tmp-1511249534.63-46501211251197 `" && echo
   ansibletmp-1511249534.63-46501211251197="` echo
   /root/.ansible/tmp/ansible-tmp1511249534.63-46501211251197 `" ) && sleep 0'
<localhost> PUT /tmp/tmp9f06MQ TO
   /root/.ansible/tmp/ansible-tmp-1511249534.6346501211251197/command.py
<localhost> EXEC /bin/sh -c 'chmod u+x
   /root/.ansible/tmp/ansible-tmp1511249534.63-46501211251197/
   /root/.ansible/tmp/ansible-tmp-1511249534.6346501211251197/command.py && sleep 0'
<localhost> EXEC /bin/sh -c '/usr/bin/python
   /root/.ansible/tmp/ansible-tmp1511249534.63-46501211251197/command.py; rm -rf
   "/root/.ansible/tmp/ansibletmp-1511249534.63-46501211251197/" > /dev/null 2>&1
   && sleep 0'
changed: [server1] => {
   "changed": true,
   "cmd": [ "/users/demo/DEMO/bin/startup.sh" ],
   "delta": "0:00:00.020024",
   "end": "2017-11-21 13:02:14.741649",
   "invocation": {
      "module_args": {
         "_raw_params": "/users/demo/DEMO/bin/startup.sh",
         "_uses_shell": false,
         "chdir": null,
         "creates": null,
         "executable": null,
         "removes": null,
         "warn": true
      }
   },
   "rc": 0,
   "start": "2017-11-21 13:02:14.721625",
   "stderr": "",
   "stderr_lines": [],
   "stdout": "Tomcat started.",
   "stdout_lines": [ "Tomcat started." ]
}

TASK [start-tomcat : debug] *************************************************
**********************************************************************
task path: /users/demo/vivek-playbook/roles/start-tomcat/tasks/main.yml:10
Tuesday 21 November 2017  13:02:14 +0530 (0:00:00.150)       0:00:09.156 ******
ok: [server1] => {
   "changed": false,
   "msg": [
      "Start Tomcat task ended with message: {'
         stderr_lines': [], u'changed': True, u'end': u'2017-11-21 13:02:14.741649', u'stdout':
         u'Tomcat started.', u'cmd': [u'/users/demo/DEMO/bin/startup.sh'], u'rc': 0, u'start':
         u'2017-11-21 13:02:14.721625', u'stderr': u'', u'delta': u'0:00:00.020024',
         'stdout_lines': [u'Tomcat started.']}",
      "Tomcat started - True"
   ]
}
META: ran handlers
META: ran handlers

PLAY RECAP *******************************************************************************
*********************************************************
server1  : ok = 9    changed = 4    unreachable = 0    failed = 0

Tuesday 21 November 2017  13:02:14 +0530 (0:00:00.042)       0:00:09.198 ******
===============================================================================
install-tomcat : Install Tomcat artifacts ------------------------------- 6.76s
/users/demo/vivek-playbook/roles/install-tomcat/tasks/main.yml:5 --------------
Gathering Facts --------------------------------------------------------- 1.52s
 ------------------------------------------------------------------------------
install-tomcat : Copy Tomcat to user home ------------------------------- 0.26s
/users/demo/vivek-playbook/roles/install-tomcat/tasks/main.yml:37 -------------

install-tomcat : Clean DEMO environment --------------------------------- 0.26s
/users/demo/vivek-playbook/roles/install-tomcat/tasks/main.yml:19 -------------

start-tomcat : Start Tomcat --------------------------------------------- 0.15s
/users/demo/vivek-playbook/roles/start-tomcat/tasks/main.yml:5 ----------------

install-tomcat : debug -------------------------------------------------- 0.06s
/users/demo/vivek-playbook/roles/install-tomcat/tasks/main.yml:11 -------------

install-tomcat : debug -------------------------------------------------- 0.06s
/users/demo/vivek-playbook/roles/install-tomcat/tasks/main.yml:29 -------------

install-tomcat : debug -------------------------------------------------- 0.04s
/users/demo/vivek-playbook/roles/install-tomcat/tasks/main.yml:47 -------------

start-tomcat : debug ---------------------------------------------------- 0.04s
/users/demo/vivek-playbook/roles/start-tomcat/tasks/main.yml:10 ---------------
Hit the following URL and you will be directed to a page as shown below − http://10.76.0.134:11677/HelloWorld/HelloWorld
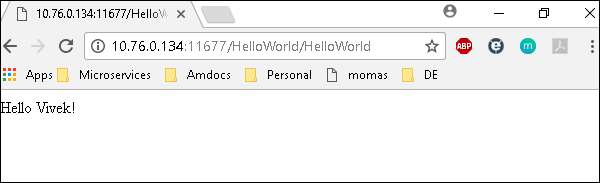
The deployed war just has a servlet which displays “Hello World”. The detailed output shows the time taken by each and every task because of the entry added in ansible.cfg file −
[defaults]
callback_whitelist = profile_tasks